User:John Broughton/VisualEditor - Hilfesystem
| Hinweis: Wenn Du diese Seite bearbeitest, stimmst Du zu, dass Dein Beitrag unter der [CC0] veröffentlicht wird. Mehr Informationen findest du auf der Public Domain Hilfeseite. |
| VisualEditor-Portal |
|---|
 |
| Allgemein |
| Über VisualEditor |
| Hilfe bei der Einführung |
Den VisualEditor öffnen
Erste Schritte: Die VisualEditor-Werkzeugleiste
| Die Werkzeugleiste erscheint ganz oben auf dem Bildschirm, wenn man mit VisualEditor bearbeitet. Die Leiste enthält einige bekannte Symbole: | |
| Rückgängig machen und Wiederholen der vorgenommenen Änderungen. | |
 |
Headings pull-down menu: allows you to change how the paragraph is formatted. To change the style of a paragraph, put your caret in the paragraph and select an item in this menu (you don't have to highlight any text). Section titles are formatted "Überschrift", and subsections are "Überschrift 2", "Überschrift 3", and so on. Das normale Textformat ist „Absatz“. |
 |
Formatting: Clicking the "A" opens a menu. For any item to have an effect, you must have first selected (highlighted) some text.
|
 |
Verlinkungstool: Die Kette ist das Verlinkungstool. Wenn man darauf klickt (typischerweise nach Markieren eines Textausschnittes) öffnet sich der Verlinkungsdialog. |
 |
⧼visualeditor-toolbar-cite-label⧽ menu: The "⧼visualeditor-toolbar-cite-label⧽" menu is used to add inline citations (also called "footnotes" or "references"). All projects have access to "⧼visualeditor-dialogbutton-reference-tooltip⧽" reference formatting and the ability to "⧼visualeditor-dialog-reference-useexisting-tool⧽" citations, using this menu. This menu also gives you quick access to local citation templates, if these are enabled on your wiki. (Anleitungen, um lokale Quellenvorlagen für ein bestimmtes Wiki zum ⧼visualeditor-toolbar-cite-label⧽ hinzuzufügen, finden sich unter $1.) |
 |
Listen und Einrückungen: Die beiden ersten Schaltflächen erlauben dir, den Text entweder als Aufzählungszeichen oder Nummerierte Liste zu formatieren. Die letzten beiden Schaltflächen ermöglicht es dir die Einrückungsebene der Einträge zu verändern. |
 |
Einfügen: Das Einfügen kann sich von Projekt zu Projekt unterscheiden. Hier findet sich eine Liste aller möglichen Optionen die auftauchen könnten.
|
| Special character insertion: The "Sonderzeichen" (Ω) icon on the "Einfügen" menu, when clicked, displays a dialog showing many special characters. By clicking on a specific character, you place it into the text. These special characters include some standard symbols, accents, and mathematical symbols. (This list may be customized locally. See VisualEditor/Special characters for instructions.) | |
 |
The Seitenoptionen menu is to the left of the ⧼visualeditor-toolbar-savedialog⧽ button. On this menu there are options to adjust page settings, such as whether the page is a redirect, or how it is indexed; to add, edit, or delete categories; and to see, using the "Sprache" item, the list of articles on the same subject that are in other languages. You can also switch (one-way only) from VisualEditor to the classic wikitext source editor without losing the editing work you've done. |
Saving changes
Links bearbeiten
 |
Links can be added through the "Link" icon (links in a chain) in the toolbar, or by using the shortcut Ctrl+K (or ⌘ Command+K on a Mac). If you select (highlight) text and then press the "Link" button, a link will be inserted using that text. For single-word links it's enough to just do it while the caret is on that word. |
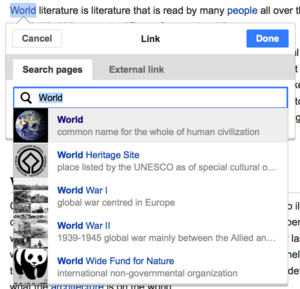 |
When you use either the button or the shortcut, a dialog will open in which you may type the link. VisualEditor will try to help with internal links by looking for likely matches as you begin to type. |
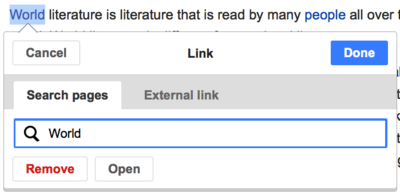 |
Once you have entered or selected the link, you complete the linking process by pressing ↵ Enter, pressing the "Fertig" button, or just clicking outside of the box. Your link will immediately appear on the VisualEditor page, but it will not be saved until you save the entire page. |
 |
To link to a web page on another website, the process is the similar: Choose the "External site" tab, and enter a URL in the box. |
| External links without labels look like this: [1]. You can add these by placing your cursor away from any word (e.g., after a space). Open the link tool by clicking on the button or pressing the shortcut keys. Type the URL in the box, and click the "Fertig" button to insert the link. | |
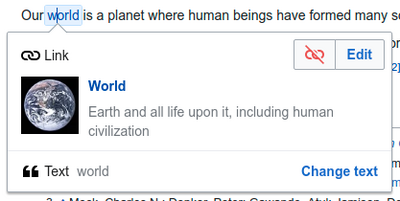 |
To change or remove an existing link, click within the text for that link, then press the "Link" icon that appears near it. The dialog will appear, for editing. (You can also get to the dialog with the Ctrl+K keyboard shortcut.) In the dialog, you can then change where the link goes. You can also remove the link altogether by pressing the "Entfernen" button in the lower left corner of the dialog. |
Einzelnachweise bearbeiten
Einen bestehenden Einzelnachweis bearbeiten | |
 |
To edit an existing reference, click on it where it appears in the text (usually as a bracketed number). You will see either a "⧼visualeditor-dialogbutton-reference-tooltip⧽" icon (bookmark) or an icon (and name) for the template that was used to create this reference. Clicking on this icon will open a dialog where you can edit the reference. |
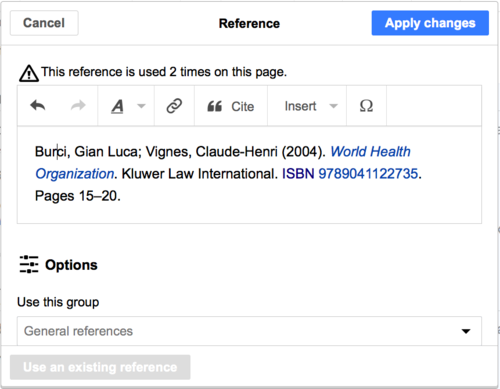 |
If what appears is the "⧼visualeditor-dialogbutton-reference-tooltip⧽" icon, clicking on it opens the Reference dialog, where you can edit the reference's contents. Many wikis use templates to format references. If a template is used in your reference, then all the text in the template will be highlighted when you click on the reference information. If a template was used and you've clicked on information in that template, then the Vorlage icon (puzzle piece) will appear. Click on that icon to edit the content of the template in the template mini-editor dialog. |
 |
If, instead of the "⧼visualeditor-dialogbutton-reference-tooltip⧽" icon (bookmark), what appears when you click on a reference is an icon for a standard template for citations, then clicking on that icon will take you directly to the template mini-editor dialog. |
 |
Inside the template mini-editor, you can add or remove types of information or change current content. Only fields (template parameters) that have content are supposed to be shown initially. To add fields, click on "⧼visualeditor-dialog-transclusion-add-param⧽" at the bottom of the mini-editor. |
| Click on "Änderungen übernehmen" when you're done. | |
Einen bestehenden Einzelnachweis wiederverwenden | |
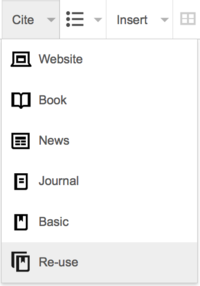 |
If the page already contains a citation that applies to the text you want to source, then you can choose to re-use the existing citation. To re-use an existing reference, place your cursor in the body of the text where you want to add a new reference (number) for that citation. Then click on the "⧼visualeditor-dialog-reference-useexisting-tool⧽" item from the "⧼visualeditor-toolbar-cite-label⧽" menu. |
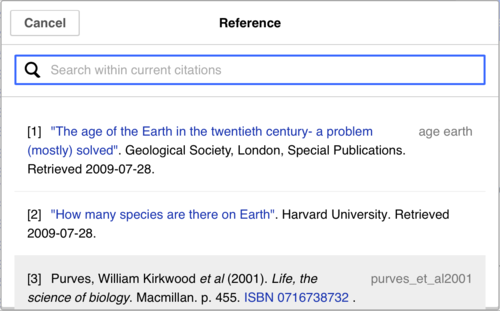 |
In the ⧼visualeditor-dialog-reference-title⧽ dialog, look at the list for the reference you want to reuse, and select it. If there are many references, you can use the search box (labeled "⧼visualeditor-reference-input-placeholder⧽") to list only those references that include certain text. |
Einen neuen Einzelnachweis hinzufügen | |
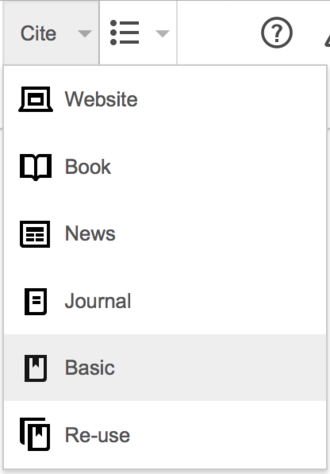 |
Um ein Zitat über das Menü "$1" hinzuzufügen, platziert man den Cursor an der Stelle im Text, an der das Zitat eingefügt werden soll. Dann wählt man im Menü die entsprechende Zitierart aus. |
Einfaches Referenzieren verwenden | |
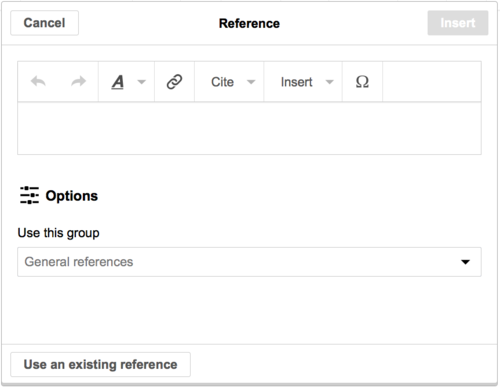 |
Shown here is what you will see if you select the "⧼visualeditor-dialogbutton-reference-tooltip⧽" item. In the Reference editor, you can add your citation, including formatting. You can make the reference belong to a given group, although normally this is left blank. (This option is used to display groups of references with the "⧼visualeditor-dialogbutton-referenceslist-tooltip⧽" tool.) |
 |
In the Reference dialog, if you want to include a template in your new reference, click the Vorlage icon (puzzle piece) in the "Einfügen" toolbar menu within the Reference editor. |
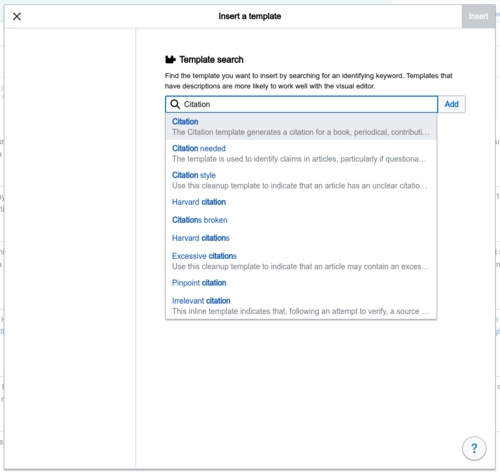 |
Then, look for the template you want to use, add it and edit it as you would any other template. (See the Editing templates section, below, if you need more information about templates.) After you're done editing your new template, click on "Änderungen übernehmen" to return to the Reference editor, and "Änderungen übernehmen" again to return to the page you're editing. |
 |
If there isn't already a list of references on the page (for example, if you're adding the first reference for the page), you need to specify where the list of references, and their text, will be displayed to the reader. Place the cursor where you want to display the references list (usually at the bottom of the page), open the "Einfügen" menu and click the "⧼visualeditor-dialogbutton-referenceslist-tooltip⧽" icon (three books). |
 |
If you are using several groups of references, which is relatively rare, you can specify the group in this dialog. Only the references that belong to that group will be displayed here. The final step in the References list dialog is to click "Einfügen". |
Using standard cite templates | |
 |
Your local wiki may have added extra citation templates to this menu. This offers quick access to the most-used citation templates. (Instructions for adding extra citation templates to your local wiki are available at VisualEditor/Citation tool.) |
 |
Clicking on a template icon such as "Cite book" will take you into the template mini-editor for that template. Important information fields may be marked with an asterisk. While the most common fields will be shown, not all of them are required. |
 |
To add more parameters, scroll down in the template mini-editor and click on the "⧼visualeditor-dialog-transclusion-add-param⧽" option. Click on "Einfügen" when you're done. |
Editing images and other media files
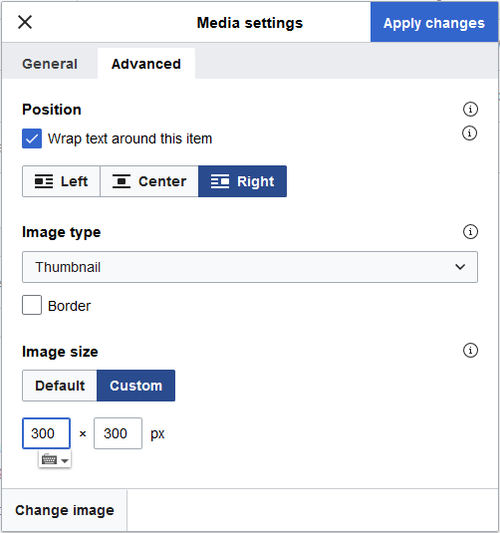
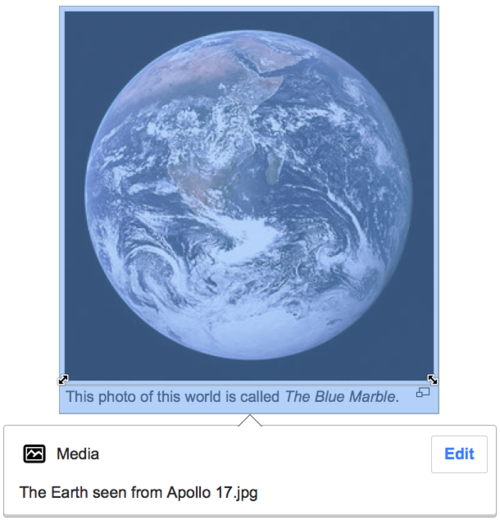
Editing images
Editing media galleries
Editing templates
| To add a new template to the page, place your cursor where you want the template to be inserted, and click on the "Vorlage" icon (puzzle piece) in the "Einfügen" menu. |  |
| Type the name of the template you want to insert. When you see it on the list, click on its name. Then click "Vorlage hinzufügen". |  |
| You can also edit templates that are already on the page by selecting them (they turn blue), and clicking on the "Vorlage" icon (puzzle piece) that appears. |  |
| Adding a new template or opening an existing one opens the "⧼visualeditor-dialog-transclusion-title⧽" dialog. If the template has been updated to contain TemplateData information, then the dialog will show a list of individual parameters; otherwise, a link to the documentation will be available in the dialog.
If the template does not use named parameters, then use numbers as the name for each nameless parameter. The first un-named parameter is named |
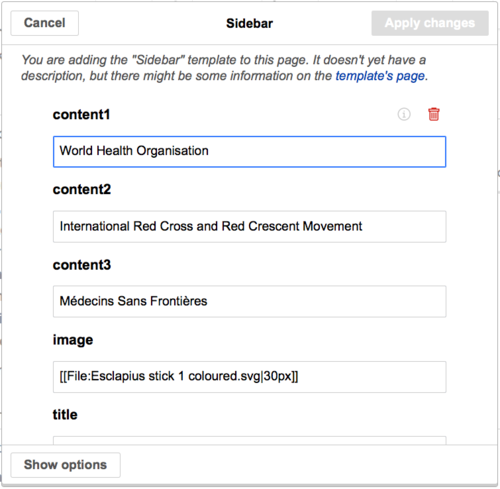 |
| For an existing template, you edit the parameters already listed, and you can add additional parameters by clicking "⧼visualeditor-dialog-transclusion-add-param⧽", at the very bottom of the dialog. | 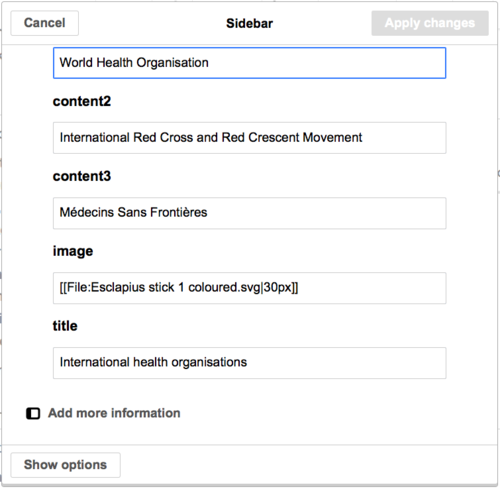 |
When a template embeds other templates, these sub-templates will appear inside the parameters that display them. They can be edited or removed inside the parameter field. New sub-templates are added by following the steps of adding a parameter. You may need to check the template documentation to make sure that the sub-template is supported. |
 |
| When you're done, click "Änderungen übernehmen" to close the dialog and return to the page editor. | |
Substituting templates | |
When a template must be substituted, type Autocompletion doesn't work with Then, click the green "Vorlage hinzufügen" button. |
 |
| Add any parameters as usual and "Änderungen übernehmen". |  |
| You will see the template expand on the page after you click "Änderungen übernehmen". When you're ready save the page. |  |
Tabellen bearbeiten
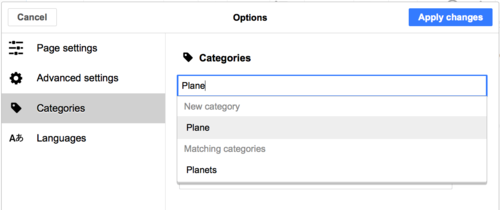
Kategorien bearbeiten
Seiteneinstellungen bearbeiten
Editing mathematical formulae
Editing poems and other special items
Some items, such as poems and musical scores, are not yet supported by VisualEditor. Until they are, you will need to edit the source wikitext directly if you want to add these or change these.
You can not add an automatic signature or datestamp to a page in VisualEditor.
Keyboard shortcuts
Many editors are used to entering wikitext directly, especially bold, italics and wikilinks. Keyboard shortcuts allow to quickly insert similar formatting without having to use toolbar items. Here are the common general shortcuts in VisualEditor:
| PC shortcut | Aktion | Mac shortcut |
|---|---|---|
| Ctrl+B | Fett | ⌘ Cmd+B |
| Ctrl+I | Kursiv | ⌘ Cmd+I |
| Ctrl+K | Link einfügen | ⌘ Cmd+K |
| Ctrl+X | Ausschneiden | ⌘ Cmd+X |
| Ctrl+C | Kopieren | ⌘ Cmd+C |
| Ctrl+V | Einfügen | ⌘ Cmd+V |
| Ctrl+Z | Rückgängig | ⌘ Cmd+Z |


