Wikibase/Creating and deleting data/en-gb
Overview
This guide is an overview of the available tools and techniques for adding data to and deleting data from Wikibase.
Creating data
Which tool should I use?
I need to import a larger amount of data
I have my data in another format in a different data store that I want to keep reconciled with Wikibase after import
I want to input various kinds of data manually while ensuring all needed fields are present
I know Python and want to import data automatically
I want to structure my data to be imported from a flat text file
OpenRefine
OpenRefine is a data-wrangling tool that can be connected to a Wikibase as well as a wide variety of other data stores. Users of OpenRefine can transform and map their data to make it suitable for import into and reconciliation with Wikibase.
For information on using OpenRefine with Wikibase, see their documentation overview.
WikibaseIntegrator
For users familiar with the Python programming language, WikibaseIntegrator can be an extremely powerful tool for adding data to a Wikibase.
The code repository's documentation contains many useful examples that you can use to create a bot, a long-running program, to import your data. Once authenticated and customised, your bot can import data with minimal intervention on your part.
We recommend giving the documentation a thorough read.
https://github.com/LeMyst/WikibaseIntegrator
QuickStatements
QuickStatements is a tool developed by one of the community's most prolific toolmakers, Magnus Manske, QuickStatements is the original tool for adding data into Wikibase.
QuickStatements accepts two forms of commands for batches: QuickStatements v1 and QuickStatements v2 (CSV).
As an example, we will present commands in both v1 and CSV format that perform the same action: creating a new item. For simplicity’s sake we will use items and properties from Wikidata, but of course these commands will look different when applied to your own Wikibase.
We will provide QuickStatements with:
- a command to create a new item with a new QID (an item’s unique identifier number)
- a Label in english (language code: English): “Doctor Worm”
- a Description in english (language code: English): “1998 song performed by They Might Be Giants”
- property interested in (P2650)
- item drum kit (Q128309)
v1
QuickStatements v1 syntax is command-based, with one tab-separated line per command.
Here’s what our example looks like in v1 syntax:
CREATE
LAST	Len	Doctor Worm
LAST	Den	1998 song performed by They Might Be Giants
LAST	P2650	Q128309
CSV
QuickStatements also understands commands in a CSV format. The first line is a header that defines the contents of each column; the lines that follow supply information to be applied to Wikibase according to the contents of each column's header.
Here’s what our example looks like in CSV syntax:
qid,Len,Den,P2650
,Doctor Worm,1998 song performed by They Might Be Giants,Q128309


Input
Navigate to your QuickStatements interface.
For users of Wikibase Suite on Docker, QuickStatements comes preinstalled and is available at http://localhost:8840/ .
For users of Wikibase Cloud, QuickStatements is available in the left sidebar: <yourhostname>.wikibase.cloud/tools/quickstatements
Click “New batch”. Paste your commands into the window and press the corresponding “Import” button for the format you have chosen.

On the next screen you will see a summary of what QuickStatements plans to do with your commands. If everything looks right, click “Run”.

Result
We have now created an item ("Doctor Worm", QID newly created) and a statement ("Doctor Worm is interested in drum kits"). You will see a regular item page much like the one in the screenshot.
For much, much more detailed information on QuickStatements, check out its help page.
Cradle
Another tool by Magnus Manske, Cradle allows the reliable manual creation of new Wikibase items using web forms or ShapeExpressions. Cradle is useful for Wikibase administrators who wish to allow creation of lots of items manually, all of which need to conform to a particular schema.
Here’s how to start using Cradle:
- If you are using Wikibase Suite, install the Cradle software. Wikibase Cloud offers Cradle already installed.
- Write definitions for the input forms you want to use to perform your data entry. You can do either or both of the following:
- Create form definitions on a special page in your Wikibase(Project:Cradle).
- Install the EntitySchema extension (on Suite; the extension is installed on Cloud but not currently working). Then define some ShapeExpressions in the EntitySchema namespace on your Wikibase.
Forms
Using Cradle’s specification format, you can create a form in Cradle that prompts the user for the fields you specify.
You define these forms on a special page in your wikibase: <your_wikibase_url>/wiki/Project:Cradle (Suite and Cloud alike).
Here’s an example of creating a form for Cradle.
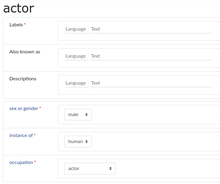
On Wikidata’s Cradle page there’s an “actor” form defined. The definition looks like this:
== actor ==
;P21:hardselect:Q6581097,Q6581072|mandatory
;P31:hardselect:Q5|mandatory
;P106:hardselect:Q33999,Q2526255,Q28389,Q2059704|mandatory

This creates a form titled “actor” that prompts the user to fill in fields toward creating a new item.
In addition to the “Labels”, “Also known as” and “Descriptions” fields which appear in every form, this form prompts the user with the following three fields defined in the example above:
- sex or gender (P21) — “hardselect” creates a chooser, offering two options, male (Q6581097) or female (Q6581072). This field is “mandatory”, meaning the user must make a choice in order to submit the form.
- instance of (P31) — This “hardselect” creates a chooser with only one option, human (Q5), ensuring that every item created is an instance of a human being, which is of course the case for all possible entries in this form.
- occupation (P106) — This chooser offers four options, of which the user must choose one: actor (Q33999), film director (Q2526255), screenwriter (Q28389) or television director (Q2059704).
In Cradle, the form appears as you see it on the right.
See this Wikidata page for more implementation examples.
ShapeExpressions
If you have the MediaWiki extension EntitySchema installed, you can also create forms like the example above in a different way: by defining schemas in your Wikibase’s EntitySchema namespace. (This feature doesn’t currently work on Wikibase Cloud.)
The syntax for these schemas is known as ShapeExpressions, a data modeling language. Once you have created a valid EntitySchema, you can enter its number in Cradle (“E12345”) to create forms with fields defined in that EntitySchema. Users then fill out those forms to create items, just as in the example above.

Here’s an example of creating an EntitySchema used by Cradle.
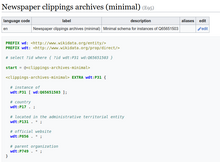
Wikidata has an EntitySchema for “newspaper clippings archives”:

That ShapeExpression definition produces a form in Cradle that appears as you see it on the right.
For much more information on Cradle, see:
- https://github.com/magnusmanske/cradle
- https://www.wikidata.org/wiki/Wikidata:Cradle
- https://www.w3.org/2013/ShEx/Primer
- https://shexspec.github.io/talks/2017/10-28-wikidatacon/#(1)
Deleting data


If you have imported data you didn’t intend to, or when you need to delete data for any other reason, and you are a member of the Administrator’s group, you can delete the data on a given page. Simply follow these steps:
- Go to the page of the item you wish to delete.
- On the top right of the page, click “More” and select “Delete” from the drop-down.
- On the deletion page, select the reason and provide context as needed, then click the “Delete page” button.


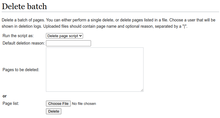
If you are a member of the Bureaucrats user group, you can use the Special:DeleteBatch page enabled by the DeleteBatch extension:
- Click on “Special pages” in the left sidebar.
- Find and select “Delete batch of pages”.
- Choose a username (probably “you”) to be shown in the deletion logs.
- Choose a reason for the deletion.
- Provide a list of pages to be deleted, either in the text field or loaded from a text file.
- Click “Delete”.
If you wish to delete page revisions, read the corresponding section of the MediaWiki manual.
